
How to Install USB Devices under
Windows 10 & Windows 8
Download this document as a pdf file
With the release of Windows 8, and continuing with Windows 10, Microsoft imposed many restrictions on what it will let you install. The casualties include legitimate USB device drivers. To use the majority of USB data acquisition devices you now need to disable Windows driver enforcement before installing your USB drivers.
If you have upgraded to Windows 8 or Windows 10, and Windows is not recognising your USB instruments, go to Device Manager and remove the device there (Section 1) before proceeding as in Sections 2 and 3 below.
1. When upgrading to Windows 10: Remove the USB Drivers
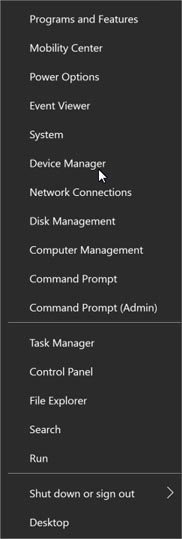
- Open Device Manager. You can do this via the Windows Power User Menu, which is also known as the Windows Tools Menu. To access this, on your keyboard press the Windows and X keys simultaneously. Alternatively you can right-click the Start menu.
- In Device Manager, under "Other Devices", you will see your USB data acquisition hardware with a yellow warning sign. Right click the device and choose Uninstall. You will be asked to confirm that you want to do this.
You can now follow the next sections to re-install your drivers.
2. Disable Windows Driver Signature Enforcement
This involves restarting your computer three times. Make sure then that you have closed any open programs before proceeding.
-
Tell Windows you are about to temporarily change your computer settings.
- In Windows 10, click the Start button and select Settings.
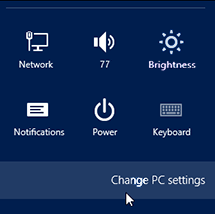
In Windows 8, move your mouse to the bottom right of your screen. Select the Settings gear and choose Change PC Settings.
- Windows 10: Choose Update & Security and, in early versions of Windows 10, select Recovery.
Windows 8: Choose General.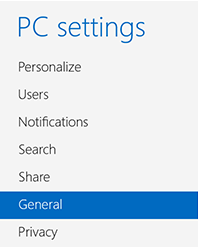
- Windows 8 and 10: Go to Advanced start-up and click the Restart now button. Your computer will reboot.
- In Windows 10, click the Start button and select Settings.
- When the computer restarts you'll be asked to choose an option.
- Select Troubleshoot

- From the menu that appears choose Advanced Options followed by Startup Settings.

- From the Startup Settings screen, click the Restart button. You computer will again reboot.
- Select Troubleshoot
- At the Startup Settings screen, press either the 7 or F7 key on your keyboard to disable driver signature enforcement. Your computer will again restart.
- Sign in as normal.
- You can now install your USB drivers as detailed below.
3. Install the USB Device Drivers
- Open Device Manager as detailed above.
- Under "Other Devices" you will see your USB data acquisition hardware with a yellow warning sign. Right click the device and choose Properties. The USB Properties box appears.
- Select the Driver tab and choose the Update Driver button.
- Browse for your driver in your Windmill folder, for example c:\Windmill Software\Windmill\Drivers64\. Click Next.
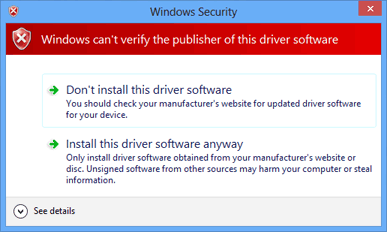
- Windows will ask you confirm that you want to "install this driver software anyway".
- You are now ready to use your USB device.
When you next restart your PC, Windows' driver enforcement will be restored.
Any questions e-mail techsupport@windmill.co.uk or ring +44 (0)161 834 6688. More technical support help….