Collecting Readings from Mark 10 Force Gauges
Windmill software lets you continually log data from Mark 10 Force Gauges, and other instruments with an RS232, on a PC running Windows. All data is time-stamped and can be imported into Excel either during or after data collection. Alternatively, subscribers to the Monitor newsletter (ISSN 1472-0221) can download free logging software: ComDebug. This lets you log data from one instrument and save it in a text file. After collection is finished data can be imported into Excel.
- Run the Windmill ComDebug, select Create a new Windmill Instrument File, and enter your force gauge's serial communication settings.
- Run the Windmill DDE Panel, Logger or Chart program to save or display data from your force gauge.
After you have entered your configuration settings with ComDebug, you don't need to use this again and can go straight to the logging and display programs.
Setting up Your Mark 10 Force Gauge | Using ComDebug to Enter Data about Your Mark 10 | Data Logging Options | Getting the data into Excel | Fault-Finding | Comments
Setting up Your Mark 10 Force Gauge
These instructions are for a Series 4 or 5 Force Gauge.
- To set the Mark 10 to communicate over RS-232, select Serial/USB Settings from its menu.
- Select RS-232 from the menu that appears (default factory setting is on).
- Select the Data Format: choose Numeric + Units. Output format includes the value and unit of measurement. Compression values are positive, tension values are negative (as default factory setting).
- Check which Baud Rate the force gauge is using (default factory setting is 9600).
- Save the settings and go back to the home screen.
- Choose the Data Key functions menu and check that RS232/USB Output is selected (default factory setting is enabled).
For more information see your User Guide.
Using ComDebug to Enter Data about Your Mark 10
For an overview of entering the configuration settings see the Getting Started with COMIML and ComDebug page. Specific examples for Mark 10 Series 4 and 5 Force Gauges are given below.
COM Port Settings
These must be the same as your force gauge uses. If in doubt start check the gauge's Serial/USB settings menu.
| Comm Port: | Select the port to which your instrument is connected. |
| Baud Rate: | as the gauge, by default 9600 |
| Data Bits: | always 8 |
| Parity: | always None |
| Stop Bits: | always 1 |
| Flow Control: | None |
Data Format
In ComDebug's Message Screen, enter a command or prompt string to send to the force gauge to ask for data. Click the Send button, and the instrument should send a reply. Now click the Parse button and enter instructions to extract the data from the force gauge's reply. Check your Mark 10 User's Guide for details of the commands to send, and the format of the reply. The example given below requests the currently displayed reading. Use the non-print menu to enter the carriage return (<CR>) and linefeed (<LF>).

| Example prompt command: | ?<CR><LF> |
| Example data text string: | -0.07 <CR><LF> |
| Data format: | ASCII |
| Example parsing: | Ignore Until +- Extract Carriage Return |

Instrument Timing
| Read: | Read Directly |
| Timeout: | 5000 ms |
| Instrument Idle or Wait Time: | 250 ms |
| Data Persistence Time: | 5000 ms |

What Next?
Follow steps 8 to 12 at the Getting Started with ComDebug page.
Further Information:
COM Port Settings
Mark 10 Series 5 User's Guide
Mark 10 Series 4 User's Guide
Now open Windmill DDE Panel
This applies if you are using the Windmill software suite to display and log data (and not just the free ComDebug).
- From DDE Panel's File menu select Load Hardware Setup and choose the *.ims file you just saved.
- Connect your channels. You should see the correct values in DDE Panel.
- Proceed similarly for the Logger and Chart programs.
Data Logging Options with Windmill Logger
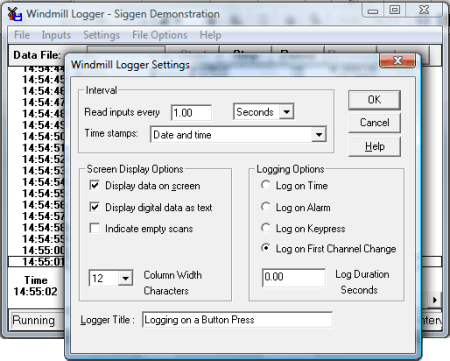
- Log only when new data is available from your instrument: when a weight changes on a balance for instance. Even if two items weigh the same, Windmill knows that a change has occurred, so no readings are missed.
- Log to a new data file at regular intervals, every hour or every 5 minutes for example. This is useful in continuous, long-term logging.
- Log data only when channels are in an alarm state.
- Log data for a fixed duration, for example during an alarm condition and for ten minutes afterwards.
- Log data when you press the space key on the keyboard
- Use Excel to start and stop logging.
- Log from different channels at different rates.
- Log from different channels to the same or different files.
- Log data from RS232 instruments alongside Modbus and Ethernet devices.

Setting some of the Logging Options
Getting the data into Excel
You can use the Windmill Logger or ComDebug program to collect data, and after collection has finished import it into Excel. Alternatively, you can collect data with Excel in real-time by using an Excel macro to read data from the Windmill DDE Panel or RTD server.
Fault Finding
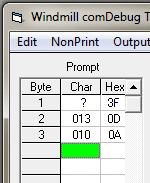
If you are unable to get data from your force gauge go back to ComDebug's Terminal screen. Make sure your command is shown in the prompt grid, like in the picture. Click the Send button: does your instrument reply?
- If you only see your command being sent, and no data...
- Make sure that the unit is switched on and plugged into the PC's com port.
- Check that the communication settings you entered in ComDebug match those currently in use by the unit: COM port, baud rate, parity, etc.
- If using a USB-RS232 converter, its settings must also match those used by the unit - read the USB-Serial page for details, especially point 7.
- If still no luck see our Testing Serial Port Communication page.
- If, in ComDebug you see data coming in but DDE Panel isn't showing it, you may need to edit your parsing settings. Go to ComDebug's Terminal or Message Screen, click the Parse button. Enter your Ignore and Extract Settings and click the Step menu. Is your data shown in the Value column? If not adjust your settings.
- If you are getting accurate data readings, but much slower than expected, change your sampling rate. With COMIML, Windmill can make 5 readings per second per channel. So it can record one measurement every 0.2 seconds. If you have the sampling interval set much smaller than this, then Windmill may slow down considerably and only make a couple of readings per minute.
Success?
Have you successfully used Windmill? Let us know about your project.
<
