Monitor - ISSN 1472-0221
The Newsletter for Data Acquisition and Control
Issue 258 April 2020
Good afternoon and thanks for subscribing. We hope this email finds you safe and well. We are still open and manufacturing, although there are far fewer people on the premises than normal. Like many of you, most of us are working from home and we are optimistic that the coronavirus will not significantly impact our ability to provide data acquisition systems for you.
You can download a pdf copy of this newsletter here.
Contents
* Using Modbus Devices over TCP/IP
* Your DAQ Questions Answered
* Data Acquisition News Round-Up
Using Modbus Devices over TCP/IP
Web link: https://www.windmill.co.uk/modbussettings.html
You can use Windmill to interface modbus devices over TCP/IP. Email monitor@windmillsoft.com to get your free copy of the software.
In the Windmill ComDebug program, create an instrument file and choose TCPIP Communications.
The master and slave must use the same port, usually port 502.
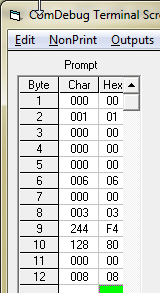
Using ComDebug to send a message via TCP/IP
Use the prompt grid in ComDebug's Message screen to send commands and data to your Modbus device. Either type directly into the Hex column or use the NumLock key on the keyboard to enter decimal addresses, codes, etc.

Entering Modbus TCP/IP settings
Each message comprises three parts: modbus application header, function code and data. When more than one byte specifies an item, the most significant byte is sent first.
The Modbus Application Header (MBAP) is a 7-byte header at the start of the message.
The Function Code specifies the type of message. It contains one byte of information (Byte 8).
| Bytes 1 & 2 | are a transaction identifier, usually 0 0, but may be different depending on how the system has been set up. |
| Bytes 3 & 4 | are a protocol identifier, always 0 0. |
| Bytes 5 & 6 | identify the number of bytes to follow. Byte 5 is always 0 as messages are shorter than 256 bytes |
| Byte 7 | identifies a unit. It is used when the Modbus device is actually several devices behind a gateway or bridge, and specifies the Slave address of one of those devices. |
| Byte 8 | is the Modbus function code, eg: 03 (read holding register) or 04 (read input registers) |
| Byte 9 | is the msb of register: starting address |
| Byte 10 | is the lsb of register: starting address |
| Byte 11 | is the msb of number of bytes to read: normally 0 |
| Byte 12 | is the lsb of number of bytes to read: for example 2 |
The function code specifies whether to read, write or perform some other function. Function 03, for example, reads the holding register. This comprises two bytes. You can read or write to a holding register. The function code 04 reads an input register; this can only be read. It may be used to return measured analogue input values such as temperature.
Modbus input registers commonly start counting at 40001. They are addressed with addresses starting at 0. You need to subtract 40001 from the register number to find the starting address. If your register address starts with a 6, for example 62592, convert this number to hex. For example, 62592 converts to F480 and so you would enter F4 into the Hex column of Byte 3 and 80 into the Hex column of Byte 4. Similarly holding register numbers start at 30001. This is really register 0001 (address 0) and is accessed using Modbus function code 03.
The Reply to a Read Input Register Request (TCP/IP) Comprises
Byte 1 = function code (04)
Byte 2 = number of bytes read
Byte 3 = 1st word, msb
Byte 4 = 1st word, lsb
Byte 5 = 2nd word, msb
Byte 6 = 2nd word, lsb
etc
Your Data Acquisition Questions Answered: DTR ON/OFF
Question
I need to switch the DTR ON/OFF to read the data from my dial gauge
Answer
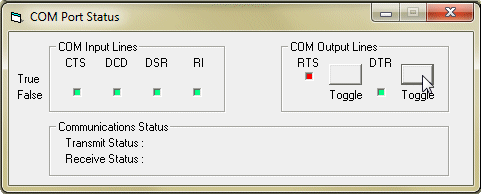
You can use ComDebug to switch the DTR (Data Terminal Ready) line on and off. ComDebug is free from https://www.windmill.co.uk/serial.html. Go to the Terminal screen and press the Status button.

Most instruments that use handshaking or flow control need DTR to be high before they will send data, Some, though, need DTR to be low and RTS (Request to Send) to be high. For continuous data logging with Windmill in this situation you need to change the connections on the RS232 cable.
Connect pins 8 and 7 (i.e. CTS drives RTS)
Connect pins 1, 4, 6 This should maintain the DTR line in the correct state, by connecting it to DCD and DSR
This would normally be done at the instrument end of the cable, rather than the PC end.
More information: https://www.windmill.co.uk/rs232-communication.html
DAQ News Round-up
Welcome to our round-up of the data acquisition and control news. If you would like to receive more timely DAQ news updates then follow us on Twitter - @DataAcquisition - or grab our rss feed.
Scientists tap unused energy source to power smart sensor networks
The electricity that powers our appliances also creates small magnetic fields that are present all around us. Scientists have developed a new mechanism capable of harvesting this wasted magnetic field energy and converting it into enough electricity to power next-generation sensor networks for smart buildings and factories.
Source: Penn State University
https://news.psu.edu/
Tiny "backpack" computers track bats
Lightweight wireless network enables precise mapping of bats' social networks
Source: Ohio State University
https://news.osu.edu/
Carbon dioxide sensor can lower energy use, reduce utility costs
New technology uses carbon dioxide sensor to manage climate control in buildings and homes.
Source: EurekaAlert
https://www.eurekalert.org/
Enhanced underwater robots can boost ocean discoveries
Underwater robots used by the oil and gas industry could be adapted to gather environmental information, providing substantial benefits both to science and resource companies.
The simple adaptations include the addition of extra sensors, cameras, acoustic transmitters and receivers.
Source: SCUBA News
https://news.scubatravel.co.uk/

Photo credit: Australian Institute of Marine Science (CC BY 4.0)
* Copyright Windmill Software Ltd
* Reprinting permitted with this notice included
* For more articles see https://www.windmill.co.uk/
We are happy for you to copy and distribute this
newsletter, and use extracts from it on your own web
site or other publication, providing the above notice
is included and a link back to our website is in place.
For previous issues by subject see https://www.windmill.co.uk/monitorindex.html
SUBSCRIBING OR CANCELLING SUBSCRIPTION Visit https://www.windmill.co.uk/newsletter.html and add or remove your e-mail address.
Windmill Software Ltd, PO Box 58, North District Office,
Manchester, M8 8QR, UK
Telephone: +44 (0)161 834 6688
Facsimile: +44 (0)161 833 2190
E-mail: monitor@windmillsoft.com
https://www.windmill.co.uk/
https://www.windmillsoft.com/
