Monitor - ISSN 1472-0221
The Newsletter for Data Acquisition and Control
Issue 303 July 2024
Welcome to July's Monitor. I hope you find it useful. Any comments to monitor@windmillsoft.com
You can download Monitor as a pdf file from https://www.windmill.co.uk/monitor/monitor303.pdf.
Contents
* Speedy settings with free DAQ Software
* Reading data from a CO2 sensor
Speedy settings with free DAQ Software
We are pleased to offer all Monitor subscribers a free copy of ComDebug. With it you can:
- Trouble-shoot TCP/IP and COM communication problems
- Log data from devices connected over Modbus, TCP/IP, and, via USB adapators or otherwise, RS232, RS422 and RS485
You need to tell ComDebug about your instrument, making choices from menus and dialogue boxes. When you click Save, ComDebug saves your settings in an *.imd file.
Some advanced users, when they want to make a small change to their settings, like to edit the imd file directly.
Here we tell you exactly what the entries in the imd file mean.
You will find your imd file in the Windmill directory. You can edit it in any text editing program, like Notepad or Wordpad.
IMPORTANT: Before editing your imd file please make a backup
Communications
The first part of the file stores details about your communications. For example:
[COMMUNICATIONS]
Port=24
Baud=115200
Bits=8
Parity=0
Stopbits=1
Handshake=0
IPAddress=
IPport=0
IPName=
These are the details you entered in the TCP/IP or COM Port Settings. They must be the same as your instrument is using.
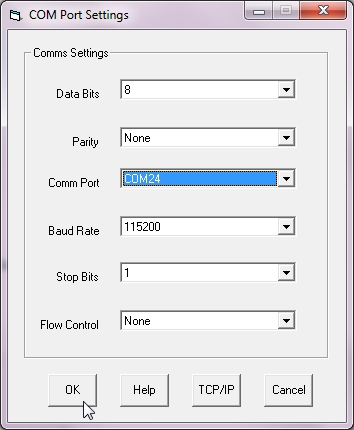
Port      - the number of the COM port to which your
            device is connected
Baud      - the baud rate of the instrument
Bits      - the group of Data Bits used, 7 or 8
Parity    - 0 represents no parity,
            1 odd parity,
            2 even parity,
            3 mark parity and
            4 space parity
Stopbits  - 1 or 2
Handshake - 0 represents no handshaking or flow control,
            1 Xon/Xoff or software handshaking,
            2 hardware handshaking.
IPAddress - when your instrument has a fixed
            IP address. It will be in the format
            89.29.204.24.
IPport    - the Port Number within the IP address.
IPName    - when your instrument has a dynamic
            IP address.
You can learn more sabout TCP/IP settings at the Understanding TCP/IP page and about com port settings at Collecting Data through the COM Port.
Message
The Message part of the file tells ComDebug how to grab the data from the string of characters sent by the instrument:
[Message1]
Name=Message_1
Prompt=W\C(013)\C(010)
Parse=\I"0123456789"\E(0)"\C(013)"
Ack=
\C indicates a non-printing character. These are detailed at https://www.windmill.co.uk/ascii-control-codes.html. \C(013) for example, specifies a carriage return, and \C(1010) a line feed.

Using ComDebug to enter the Prompt and Parse string
Prompt  - The command sent to the instrument to
          ask for data. In the example above it is W
          followed by a carriage return  - \C(013) - and
          a line feed - \C(010).

Parse   - ComDebug extracts the actual data from
          the superfluous characters around it. In our
          example above
          \I tells ComDebug to ignore everything until
          it reaches a numerical digit.
          \E tells ComDebug to extract characters until
          a carriage return - \C(013) - occurs. It stores
          the data in channel 0.

Ack     - Some instruments need an acknowledgement
          that they have sent data, which will be given
          in the Ack line.
Other options are available, for example:
\I followed by a number not in quotes, means ignore the
next n bytes
Similarly, \E followed by a number means extract the
next n bytes
\S means search for all these characters, for example
\S"data="
ComDebug can extract data in lots of ways - Extract Until or Extract the Next N are the most common but there are many other options including:
\H - Extract N Bytes as Hex
\J - Extract Integer LSB-MSB (16-bit 2s complement integer:
     2 bytes, -32768 to +32767)
\K - Extract Integer MSB-LSB (16-bit 2s complement integer:
     2 bytes, -32768 to +32767)
\L - Extract Word LSB-MSB (16-bit 2s complement integer:
     2 bytes, 0 to 65535)
\M - Extract Word MSB-LSB (16-bit 2s complement integer:
     2 bytes, 0 to 65535)
\N - Extract Signed Byte (A single byte of data interpreted
     as a value in the range -128 to +127)
\O - Extract Byte (A single byte of data interpreted as
     a value in the range 0 to 255)
\P - Extract Bit (A single bit of data, which can only
     have values of 1 or 0)
\Q - Extract Float (Four byte floating point)
\R - Extract Reverse Float (As Float, but the bytes are
     in reverse order)
\T - Record Number (enables Windmill to know that a new
     reading has been taken, even if that reading is the
     same as the previous one)
If you need help setting up ComDebug to work with your instrument - we have a series of examples at https://www.windmill.co.uk/serial_driver.html. There is also help on parsing messages at https://www.windmill.co.uk/parse.html
Free Software
Download the ComDebug software from:https://www.windmill.co.uk/comDebug/comdebug.zip
Your DAQ questions answered - Upgrading Mettler Toledo system
Question
"A Question with the configuration of ComDebug with a CO2 sensor. The modbus communication is as follows: sensor address 2, data vector 101, length 1 word. Would you be so kind to provide me the values to enter in the message to the sensor, specifically I do not understand how to enter the most significant and least significant bit data, thank you very much in advance.
Thanks
"
Answer
Assuming the 101 is in decimal, and you are using binary communications, you need to convert it to hexadecimal, ie 0065, with 00 being most significant byte and 65 being least significant. So something like the below to read the holding register.

More details on using ComDebug with Modbus instruments is at https://www.windmill.co.uk/modbussettings.html