How to Start Logging Data when you Switch on the Computer
You can automatically start Logger, and the other Windmill programs, whenever you switch on your computer.
- On the Windows Start menu, right-click the Windmill Logger icon and choose Properties. (If you don't see the Properties option, choose More and Open File Location. Now right-click and choose Properties.)
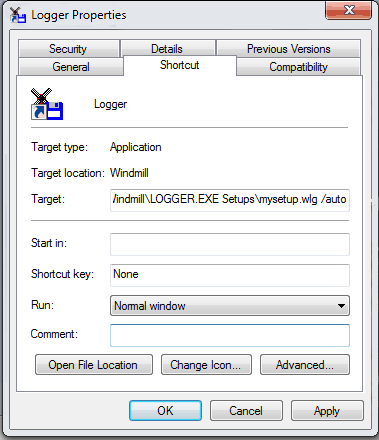
- The target box shows where Logger is located. At the end of this line add your Logger setup file (*.wlg) followed by /auto, as shown in the picture below. This means that whenever Logger is loaded it will automatically start logging data.

- Now tell Windows to run Logger on start-up. Open the Windows Start menu, find Windmill and from there right click the Logger icon. Select More then Open File Location.
- Now open the Windows Startup menu. On the keyboard press the Windows logo key + R, type shell:startup, then select OK. This will open your Startup folder.
- Copy and paste the Logger shortcut to the Startup folder.
- Logger will now start collecting data as soon as Windows loads. Data will be appended to the end of the file you specified in the Logger setup file (*.wlg). If you wish to save data to a series of files, see the notes in issue 20 of Monitor.
Any questions e-mail techsupport@windmill.co.uk.