Windmill software lets you can connect digital dial gauges (or digital indicators as they are also known) to a PC and automatically record all measurements. Data is time-stamped and can be imported into Excel either during or after data collection. Alternatively, subscribers to the Monitor newsletter (ISSN 1472-0221) can download free logging software: ComDebug. This lets you log data from one instrument and save it in a text file.

How to connect the Dial Gauge to the PC
As well as the Windmill software you need a Sylvac OPTO-RS cable. This is not only a cable, but an interface which converts the output of the gauge to a RS232 signal. Plug one end of the cable into the dial gauge and the other into a COM port of the PC. If your computer doesn't have any COM ports, you will also need a RS232 to USB connector.

Sylvac OPTO-RS cable
If your PC does not have any COM ports you can use a USB-Serial converter.
To use Windmill to collect data from a Dial Gauge, download and run ComDebug.
Using ComDebug to Enter Data about Your Sylvac Dial Gauge
This program, which is free to our newsletter subscribers, detects and saves a record of the hardware you want to use, in our case a Sylvac dial gauge.
For an overview of entering the configuration settings see the Getting Started with COMIML and ComDebug page. Specific example settings for Sylvac dial gauge are given below.

Entering the COM Port Settings
These must be the same as your Sylvac dial gauge uses. These settings should work.
| Comm Port: | Select the port to which your instrument is connected. |
| Baud Rate: | 4800 |
| Data Bits: | 8 |
| Parity: | Even |
| Stop Bits: | 2 |
| Flow Control: | None |
Extracting the Data
You now need to tell ComDebug how to ask for data from the dial gauge. This is easy as Sylvac's OPTO-RS interface will accept any character as a request to transmit the data value! Go to ComDebug's Terminal or Message Screen and type any letter into the Prompt grid. Click the Send button, and the instrument should send a reply (see Trouble-Shooting below if not).
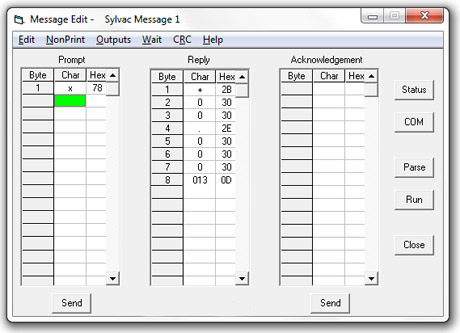
Entering a command to get data from the dial gauge, and the gauge's reply
Now click the Parse button and enter instructions to extract the data from the reply.
(<CR> indicates a carriage return. Use the NonPrint menu to enter a carriage return character. It appear as \C(013).)

Extracting the actual data from the reply: the instructions above will discard the carriage return but keep the sign and the reading .
| Example prompt command: | x |
| Example data string: | +00.0000<CR> |
| Data format: | ASCII |
| Example parsing: | Ignore Until +- Extract Until <CR> |
Enter the Timings that the Dial Gauge Uses
In ComDebug's Main Menu, select Edit the Instrument Timings and use these settings.
| Read: | Directly |
| Timeout: | 1000 ms |
| Instrument Idle or Wait Time: | 0 |
| Data Persistence Time: | 5000 ms |
Data Logging from the Sylvac Dial Gauge: ComDebug, Windmill Logger and Excel
You can:
- Log one channel or stream of data from one dial gauge with our free ComDebug program.
Further Information
More about the COM Port Settings
One of our readers - Peter Rosenbeck of Linak A/S - has compiled a guide to using an earlier version of Windmill with a Sylvac dial gauge.
Success?
Have you successfully used Windmill with your dial gauge? We'd appreciate it if you would let us know about your project. Did you have any problems getting the system to work? How has the Windmill software helped your project?
Trouble-Shooting
If you are unable to get data from your dial gauge go back to ComDebug's Terminal screen. Type something in prompt grid and click the Send button. Does your instrument reply?
- If you only see your command being sent, and no data...
- Make sure that the Sylvac OPTO-RS cable is plugged into the PC's com (RS232) port and into the dial gauge.
- Check that the communication settings you entered in ComDebug match those currently in use by the OPTO-RS cable: COM port, baud rate, parity, etc.
- If using a USB-RS232 converter, its settings must also match those used by the OPTO-RS cable - read this page for details, especially point 7.
- If still no luck see our Testing Serial Port Communication page.
- If, in ComDebug you see data coming in but Windmill Logger or DDE Panel isn't showing it, you may need to edit your parsing settings. Go to ComDebug's Terminal or Message Screen, click the Parse button. Enter your Ignore and Extract Settings and click the Step menu. Is your data shown in the Value column? If not adjust your settings.
- If you are getting accurate data readings, but much slower than expected, change your sampling rate. With COMIML, Windmill can make 5 readings per second per channel. So it can record one measurement every 0.2 seconds. If you have the sampling interval set much smaller than this, then Windmill may slow down considerably and only make a couple of readings per minute.
If you still have problems, fill in the form on our Technical Support page.